Here is a simple way to Assign a Static IP Address in Windows Vista. Just follow the instructions below, its very simple .
Step 1:
Open the Start Menu, right-click on Network, and select Properties from the Pop up menu.

Start Menu
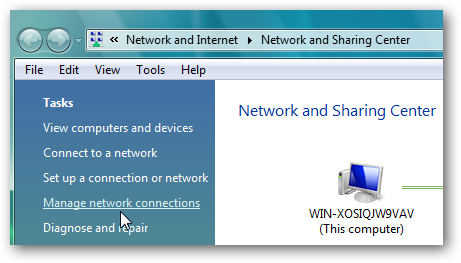
Step 2:
Select ” Manage network connections ” from the Left Pane in the Network and Sharing Center.
Step 3:
Right-click on the Network Adapter which you want to assign an IP address and Select Properties.

Step 4:
Click on the Internet Protocol Version 4 (TCP/IPv4) in Local Area Connevtion Properties and then select the Properties button .

Step 5:
Now change the following,
- IP Address
- Subnet mask
- Default Gateway and
- DNS Server Addresses
When you’re finished click on OK .

Step 6:
Now, close the Local Area Connection Properties for the settings to get into effect.

Step 7:
Open the Command Prompt and do ipconfig to verify whether the changes are successful.
To do IP Config, open Command Prompt and the patrh should be in this way,
c:\Users\pcname>ipconfig

Nice tutorial
thanks for sharing
Thanks, will check this tip.
nice tutorial… i think same will work for window 7..
ya.. Mostly same.. But some selection ll vary.. since they have upgraded a little..